Hello, fellow reptile enthusiasts! Today we are diving headfirst into the intriguing world of Tokay Gecko egg incubation. If you’re a fan of these vibrant, nocturnal lizards like us, you know that successfully breeding and hatching these fascinating creatures can be an incredibly rewarding experience.
However, proper egg incubation for Tokay Geckos requires meticulous care, patience, and the right knowledge to succeed. It’s not just about placing eggs in a container and waiting; it involves understanding their breeding habits, preparing the right setup, maintaining optimal conditions, and providing the necessary care post-hatching.
This article is a comprehensive guide on the optimal conditions and techniques for incubating Tokay Gecko eggs. Whether you’re an experienced breeder or a new hobbyist, we’ll walk you through each stage of the incubation process. So, let’s embark on this journey together, and may your breeding endeavors be fruitful!
Understanding Tokay Gecko Breeding Habits
Before we delve into the nitty-gritty of incubation, it’s essential to familiarize ourselves with the natural breeding habits of Tokay Geckos. Knowing when and how often these captivating reptiles lay eggs, along with unique characteristics of their eggs, can provide invaluable insights and enhance the success rate of your breeding program.
Firstly, let’s talk about the breeding season. Tokay Geckos, native to the warm tropical areas of Southeast Asia, typically breed during the rainy season, which usually falls between April and October. However, in a controlled environment like a home terrarium, provided the conditions are right, they can breed all year round.
A healthy female Tokay Gecko can lay a clutch of one or two eggs roughly every four to six weeks during the breeding season. That’s right, folks! Unlike some of her reptile cousins, a female Tokay doesn’t lay dozens of eggs at a time. But don’t let the small numbers fool you. What Tokay Geckos lack in quantity, they make up for in quality. These are some robust little eggs we’re talking about here!
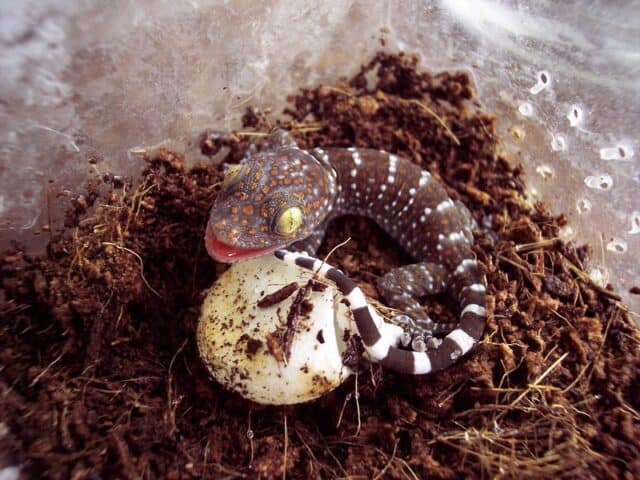
Tokay Gecko eggs are oval, white, and hard-shelled, about half an inch in diameter. In the wild, the female deposits her eggs in protected areas like tree hollows or crevices in rocks, and she attaches them firmly to a solid surface using a natural adhesive. These eggs are known for their toughness – they’re firmly stuck in place and can’t be moved without risking damage.
In a captive environment, the female will usually choose a secluded spot within the enclosure to lay her eggs. This might be under a piece of decor, in a nest box if one is provided, or even on the glass walls of the enclosure.
Remember, folks, that knowing your geckos and their natural behaviors is the foundation to successful breeding and incubation. The more you understand about your geckos, the better you can replicate their natural environment and make them comfortable.
Preparation for Incubation

Now that we have a handle on Tokay Gecko breeding habits, let’s get our hands dirty (figuratively speaking, of course!) and prepare for the incubation. As you might imagine, this isn’t as simple as snatching up the eggs and plopping them in an egg carton. Oh no, there’s a method to the madness, and we’re here to guide you through it!
When it comes to nesting, female Tokay Geckos are quite choosy. Providing an appropriate nesting box is the first step. A suitable nesting box should have a substrate like moist sphagnum moss or eco earth that maintains humidity and mimics their natural laying ground. It should also be secure and somewhat secluded to make your geckos feel safe.
Once the eggs have been laid, gentle and careful removal is paramount. Remember, these eggs are stuck firmly, and you risk damaging them if you’re too rough. Using a razor blade or a thin, flat object can help safely detach the eggs from their substrate. It’s important to keep the eggs in the same orientation as when they were laid – abrupt changes can potentially harm the developing embryo. Marking the top of the egg with a soft-tipped marker can help keep track of the correct position.
Next, let’s talk about the incubation setup. You’ll need an incubator, of course. You can purchase a commercial reptile incubator, which will allow you to control the temperature and humidity precisely, or you can make a DIY version using a modified cooler or a plastic container. Either way, it should have a reliable heat source, a thermometer, and a hygrometer to monitor temperature and humidity respectively.
Once you have your incubator, you’ll need to prepare a suitable substrate for the eggs. Vermiculite and perlite are popular choices as they retain moisture well and help maintain humidity within the incubator. The substrate should be damp, but not wet – if you can squeeze a handful and get a few drops of water, that’s about right.
Finally, position your eggs carefully on the substrate, half-buried, in the same orientation they were laid. Make sure there is enough space between each egg to prevent them from touching, which can lead to potential problems like mold growth.
Optimal Incubation Conditions
Great job on your preparation! But the journey isn’t over yet. To ensure the successful hatching of those precious Tokay Gecko eggs, maintaining optimal incubation conditions is crucial. We’re talking about the right temperature, humidity, ventilation, and darkness. Let’s dive into the specifics and see what your eggs need to thrive.
Temperature is probably the most crucial factor in egg incubation. The ideal temperature range for incubating Tokay Gecko eggs is between 80-85°F (26.7-29.4°C). It’s essential to maintain this temperature consistently, as fluctuations can lead to developmental problems or even cause the embryos to perish. Also, interestingly, like many reptiles, the sex of Tokay Geckos is temperature-dependent. A higher incubation temperature generally produces more females, while a cooler temperature results in more males.
Humidity is another vital element that you can’t overlook. The humidity level within the incubator should stay around 70-80%. Low humidity can cause the eggs to dry out and shrivel, while too much can lead to mold growth. A fine mist spray can be used to gently raise humidity if necessary, but be careful not to directly spray the eggs.
Ventilation is equally important, though often overlooked. Eggs need to breathe, so your incubator needs to allow some airflow. However, make sure it’s not too much, as excessive air movement can dry out the eggs. Most commercial incubators come with built-in vents that can be adjusted, but if you’re using a DIY setup, you might need to create small holes for this purpose.
Lastly, Tokay Gecko eggs require darkness to develop properly. In nature, these eggs are laid in secluded spots away from direct sunlight. In your incubator, you can achieve this by choosing a non-transparent container or simply by covering it with a dark cloth.
Of course, regularly monitoring and adjusting these conditions is a must. Daily checks of your temperature and humidity levels, as well as visual inspections of the eggs, will keep you on top of things. It might seem like a lot of work, but the reward of seeing those baby geckos is well worth the effort!
Handling Potential Incubation Problems
Alright, now that we’ve got the ideal conditions set up, it’s important to note that not everything may go as smoothly as planned. Incubation can sometimes be a tricky business with unforeseen hurdles popping up. But fear not! We’ll help you identify and troubleshoot common problems you might encounter. So, buckle up, because this is where things get real!
One common problem is shrinking. You may notice your eggs appearing deflated or wrinkled. This is usually a sign of too low humidity. Remember, these eggs need a moist environment to thrive. If you spot shrinking, it’s time to increase the humidity. You can mist the substrate (but remember, avoid spraying directly onto the eggs) or add a little more water to the incubation medium.
Mold growth is another issue you may face. This can occur when humidity is too high, or the eggs are touching each other or the sides of the container. If you spot mold, carefully separate the affected eggs from the rest to prevent the mold from spreading. You might be able to save a moldy egg by gently wiping off the mold with a soft, damp cloth. But be prepared; not all moldy eggs can be saved.
Sometimes, you’ll find that an egg just doesn’t hatch, despite your best efforts. It’s disappointing, for sure, but it’s part of the process. There could be several reasons – the egg might not have been fertilized, the embryo could have died, or conditions might not have been right. The key is not to get disheartened and learn from the experience.
Occasionally, it might be necessary to intervene in the hatching process. If a baby gecko is struggling to emerge from its egg after making a small hole (a process known as pipping), you might need to assist. But only do this if it’s absolutely necessary and the baby hasn’t made progress after a day or so. Be incredibly gentle and use a pair of tweezers to peel away small bits of the shell.
Post-Hatching Care
Congratulations! If you’ve made it this far, you’re probably staring at some tiny, freshly hatched Tokay Geckos. It’s quite the sight, isn’t it? But remember, the journey doesn’t end with hatching. These little ones now require your care and attention to ensure they grow into healthy adults. So, let’s explore the post-hatching care basics.
Once a baby Tokay Gecko has fully emerged from its egg, it’s important to give it some space. Don’t rush to pick it up right away. Allow it to rest and fully absorb the remaining yolk, which provides essential nutrients for the first few days. The hatchling may look a bit dull and wrinkly initially, but don’t worry; it’ll soon plump up and show its true vibrant colors.
After a day or two, you can transfer the hatchling to a separate enclosure. This should be a smaller version of an adult gecko setup, with plenty of hiding spots and climbing surfaces. Remember, these are arboreal lizards; they like to be up off the ground. Maintain a temperature gradient with a basking spot at one end and a cooler end at the other.
Now, let’s talk food. Baby geckos need to eat! Begin feeding a few days after hatching, once they’ve had a chance to settle into their new enclosure. Small crickets and fruit flies make excellent starter meals. Remember to dust the food with a calcium supplement to support healthy bone growth.
Hydration is also key. Spray the enclosure lightly once or twice daily to maintain humidity and provide drinking water. Baby geckos often prefer to lick water droplets from their surroundings rather than drink from a bowl.
After about a week or two, depending on their size and health, you can start to consider integrating the hatchlings into the main enclosure if you wish. However, be cautious and make sure the adults will not bully or harm the young ones.
Raising baby Tokay Geckos can be an incredible experience, allowing you to witness their fascinating growth and development up close. Always monitor your hatchlings carefully for any signs of illness or distress and consult a reptile vet if necessary.
Conclusion
And there you have it, my fellow gecko enthusiasts! You’ve successfully navigated the winding path of Tokay Gecko egg incubation, from understanding their natural breeding habits to preparing and maintaining the ideal conditions for incubation, and finally to the joys of post-hatching care. Each step along the way is integral to the success of your Tokay Gecko breeding journey.
Remember, it’s a process that requires patience, careful observation, and a willingness to learn. And while challenges may arise, they’re just opportunities for you to become an even better reptile breeder. Take it from us, the joy of seeing those tiny geckos emerge from their eggs is an experience like no other. It’s worth every bit of effort!
We hope this guide proves to be an invaluable tool as you dive into the captivating world of Tokay Gecko breeding. It’s a thrilling, rewarding endeavor, and we’re glad to have you on board. Keep that passion burning, always strive to learn more, and continue sharing in the awe-inspiring beauty of these amazing creatures. Good luck with your Tokay Gecko breeding adventures!
Frequently Asked Questions
What if the incubation temperature fluctuates occasionally?
Occasional minor fluctuations in temperature might not be harmful, but it’s essential to avoid significant swings. Prolonged exposure to temperatures outside the ideal range (80-85°F or 26.7-29.4°C) can negatively impact the development of the embryo and may even result in death. Make sure your incubator maintains a stable temperature, and check it regularly to ensure it stays within the ideal range.
Can I move the eggs once they are laid?
Yes, you can move the eggs, but it must be done very carefully to avoid harming the developing embryo. When moving the eggs, maintain the same orientation as when they were laid. Abrupt changes in the position can harm the embryo. Using a soft-tipped marker to mark the top of the egg can help keep track of the correct orientation.
How long does it take for Tokay Gecko eggs to hatch?
On average, it takes between 60 to 100 days for Tokay Gecko eggs to hatch, depending on the incubation temperature. Eggs incubated at higher temperatures generally hatch quicker than those at lower temperatures.
What should I do if an egg doesn’t hatch?
Not all eggs will hatch, and that’s part of the breeding process. If an egg doesn’t hatch, it may not have been fertilized, or there might have been an issue during development. It can be disappointing, but try not to be too disheartened. Use it as a learning experience to refine your incubation process for the future.
What if the hatchling doesn’t emerge from the egg completely?
Sometimes, a hatchling might need a bit of extra help to fully emerge from the egg. If it hasn’t made progress after a day or so, you can gently assist it by peeling away small bits of the shell using a pair of tweezers. Be very careful not to harm the hatchling in the process. It’s crucial only to assist if absolutely necessary.